Thursday, February 28, 2013

The Quilty Barn Along Tutorial!...


YaY!
Thanks so much to everyone who participated in my Quilty Barn Along.


It has now been a few years and this pattern along with LOTS of others are in my book called

I left the photos here on this post as a visual for those who
are doing my new Sew Along called
Farm Girl Fridays.

Hope you join us!
for more info:)


Wednesday, February 27, 2013

The Back of my Farmers Wife Quilt!!!...


 I showed you the front of my farmers wife quilt...


But what I didn't show you...
was the back!!!


I always planned on using the vintage seed catalogue print on the back...
(it's from Lakehouse fabrics and sadly is no longer in print)

Anyhoo...

 When I went to prepare the backing...
I found that I didn't have quite enough.
(insert sad face here)


My grandma always said that
 "necessity is the mother of invention"
And so...
 I decided to "invent" a larger backing piece
 by designing and piecing a row of 
blocks into the backing fabric 
to make it larger! 


Because the quilt celebrates farm life...
I thought it only fitting to build a barn
 around some 6" blocks!

YaY!

I have always loved barns.
Although I am not a farmers wife...
I was raised on a farm and so
I am a farmers daughter:) 


I had so much fun building them and 
I decided that these quilty barns would make an adorable quilt.

And so...
I got the idea that you might have fun building barns with me!

Yep!!!

My big announcement is ...
The Quilty Barn Along!!!

If you want to "quilty barn along" with me...
let me know and I will put the tutorial
 for my barn block up... 
along with a 
Quilty Barn flickr group and a button.

Sew...how about it???
Are you in?
xx
Lori


Tuesday, February 26, 2013

My Farmers Wife Quilt is Finished!!!...


My Farmers Wife is finally complete:)
YaY!
I know I've posted about my progress about a bajillion times
 because I've been working on it for quite a while.

Every time I had a break in between deadlines...

I would sew up a block or two.


And as I progressed I posted a few pictures ....


And a few more....


until I had all of them complete and laid out on the floor to arrange in order.
(by all of them...I mean 52...for the size of quilt that I made)


I showed you my sashing, borders, binding and backing fabric.


And even showed you when I almost had the top complete.


Now it feels good to be able to show it all finished!


As usual...
I hung it on my front room wall for a quick photo shoot 
along side some of my vintagey collections.


It will eventually find it's home on my kitchen wall...
a fitting place for a farmers wife quilt I think!

I've loved making this quilt because as I have told you before...
I love making sampler quilts and I have made many over the years.
Even though I'm happy it's complete...
I must admit that I'll miss working on it:)

Tomorrow I have a
 BIG announcement...
so stay tuned...
and don't forget to 
have a quilty kind of day:)
xx
Lori

Wednesday, February 20, 2013

The Bee in my Bonnet Row Along...Row 12 - Sewing Baskets!!!


Good Morning cute people!
Thanks sew much for tuning in for row 12 of the


Today we are making sewing baskets to go with our cute row of spools:)


Layout your pieces...


Begin by sewing the half square triangles onto the sides 
of the basket and basket bottom....
trim...


Press towards the triangles.


Sew the remaining squares onto the sides of the basket bottoms like this.


Now sew the bottom basket section to the top basket section.
You can see that my seams don't line up and it bothered me enough to "unsew" it and fix it later...:)


Now sew the handle sides to the white
background piece.


Then add the top.


Next add the background sides...


and sew the handle section to the basket section for your first basket block!!!!

YaY!!!!


Now cut more basket/handle combos from your stash ...


and stitch them up for a total of 7 cute sewing baskets.


Cut background strips for sashing and sew them between the baskets as you join them together in a row.
As always...
add larger sashings on each end and trim your row to measure correctly.
Cut 2 strips and sew to the top and the bottom of your basket row.


Now you have a sweet row of sewing baskets for your quilt!


We are getting near the end of the rows!!! 

 If you are behind...
catch up quick before summer gets here and the row along ends:)

***EDIT
The row along has ended!
The pattern for this quilt, several more quilts and blocks are in my new book! 
Now you can reserve your copy of my book 
"Quilty Fun"

Don't forget to post your rows on the 
we all love to see them!!!
Have a quilty kind of day...
xx
Lori


Thursday, February 14, 2013

The Bee in my Bonnet Thimble Ruler...and another free pattern!!!


Introducing...
"Jump Rope"
another free pattern from me to you!
(Happy Valentine's Day to all of you 
sweetie pie readers out there...
I heart every one of you:)
(you can download it HERE)


I made this quilt using my 
along with 5" and 10" squares:)
I know that this shape is now called a 
"tumbler"...
 but my grandma and her sisters used to 
call it a thimble...
 and that's what I went with!


And yes...


More gratuitous photos of my kids.
Sorry for the shadows on the quilt:)


Obviously I took these at the same time 
as my Honeycomb quilt that I showed you yesterday:)


Still a windy day and trying to get a full shot of the quilt was a challenge:)


As you can see...there are two sizes of Thimble shapes in the quilt...


Sewn together top to bottom in strips.
When you sew two small thimbles together...
they are the same size as one large thimble...
making the possibilities endless!


I called the quilt "Jump Rope" because the strips reminded me of the jump ropes I used to play with at recess with all the girls.
You know the kind...
they were made of kind of colorful elongated hard plastic beads?


This quilt is super fast to cut and sew up.
Again...
I used my fabric lines all mixed together 
and 
I used yardage and 4 fat quarters 
for the back of this one.
I don't know if you can see the binding...
but it's scrappy too!
I used up leftover 2 1/2" strips by sewing them together for the binding.

Jump Rope makes a great lap quilt and 
I think it would make a fun and easy baby quilt too!


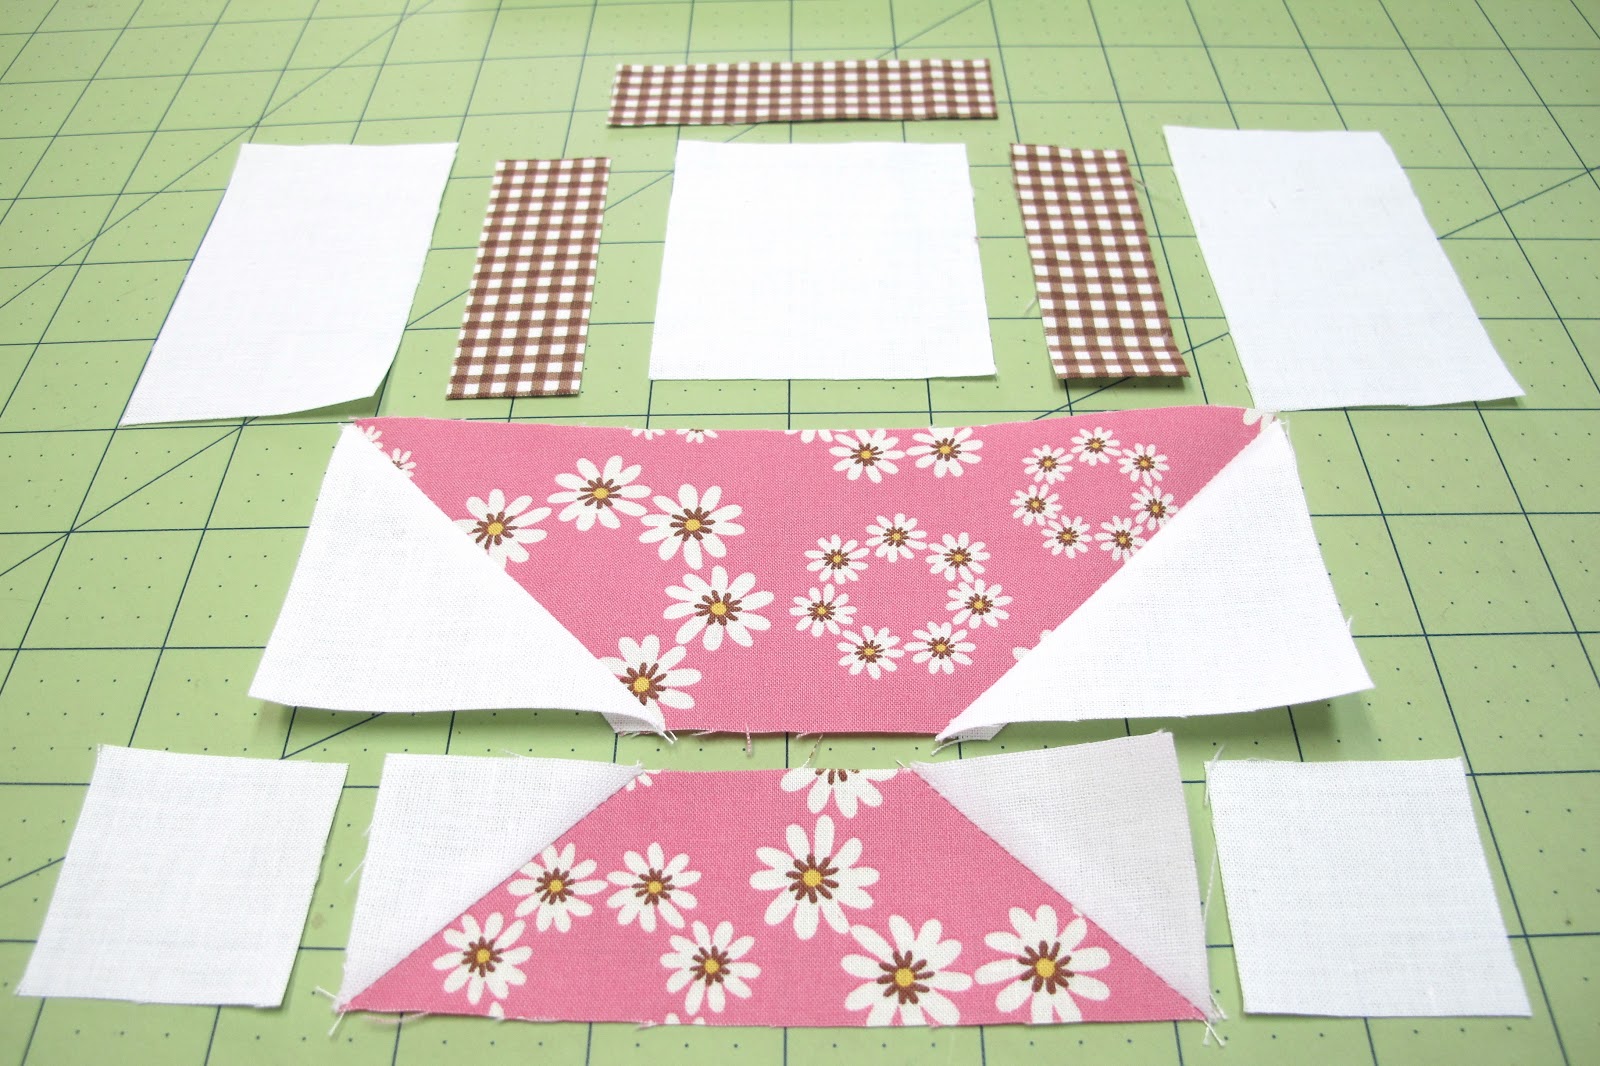
Let's talk a little bit about different ways that you can use the rulers.
I'll show you a few variations using the small ruler.
I rotary cut this thimble from a 5" square.
Easy peasy.
You can cut several...flip them around and sew them into rows.
OR...


You can sew 4 squares together...
In this case 2 1/2" size...


Line up the lines on the ruler 
 with your seam lines ...


And cut a scrappy Thimble!!!


Then you can alternate with scrappy and plain if you want:)


You can also cut  two different 5" squares in half and sew the strips together...


Line up with the center line on the ruler...


And cut.


And sew into rows this way.
These are just a few possibilities...
you could also flip the ruler and cut so that the different fabric strips 
are on each side of the thimble instead of on the top and bottom.


And for the ends of each row...


Place 2 - 2 1/2" x 5" strips with wrong sides together...
line up with the center line of the ruler and cut at the same time so that you have one in reverse...


Like this.


Or simply cut a thimble shape in half.


Sew them onto the ends of the rows so that they
 end up straight and not slanted!
YaY!!!
This makes it soooo much easier to bind:)


You can do the same thing using the large rulers and four 5" squares sewn together like I did in my Jump Rope quilt.

See what I mean?
lots of possibilities with these rulers.
A good way to play with pre-cuts and also to use up those 
extra strips and squares that we all seem to accumulate:)

And now that my rulers are here I will be using them a lot ...
I have several tutorials planned using all of them...
so stay tuned my friends...and have a quilty week end!!!
xx
Lori


Related Posts with Thumbnails